GM Link - For Aseprite
A downloadable extension for Aseprite

Send your sprites directly to GameMaker with a single click!
Using GM Link - a completely free extension for Aseprite. By using Aseprite's 'slices', you can select which sprites goes to GameMaker and keep everything in one document. This is a Windows-only extension at the moment.
Features
- Create and update sprites in your GameMaker project from Aseprite with one click
- Have all your sprites in a single Aseprite file (or multiple. Up to you!)
- You can have animated sprites as well - use Aseprite tags or (NEW, 1.7+) make a wide slice and set it to "strip" in the Toolbar
- Put your sprites in subfolders in GameMaker via Aseprite
- Adjust bounding box and origin within Aseprite
- Super easy setup
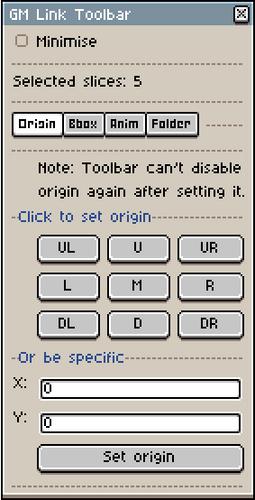
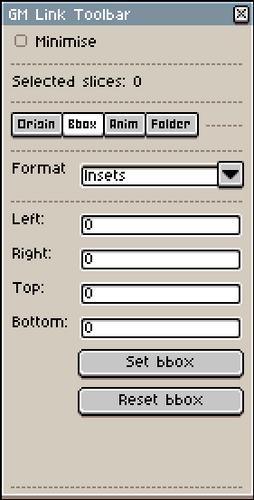
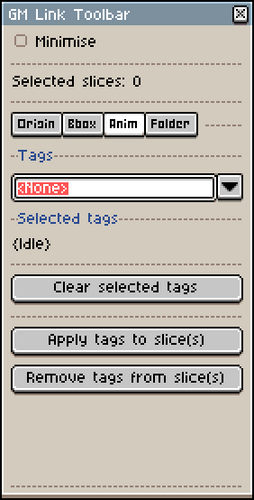
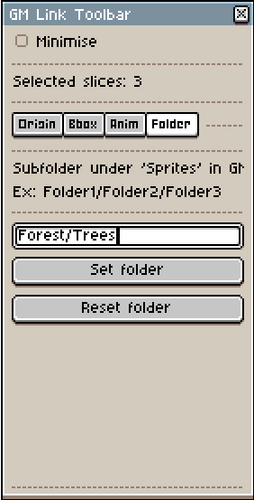
- NEW! (v1.6+) - Now featuring a simple Toolbar to make things even easier
How to setup
- Download the GM Link extension below
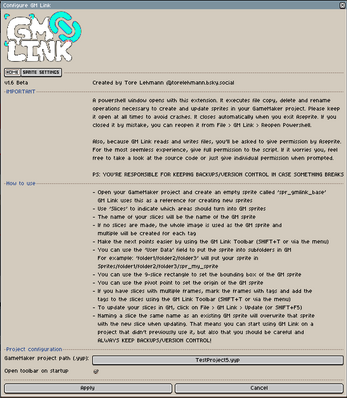
- Open Aseprite and go to Edit -> Preferences -> Extensions, and click 'Add extension' and open the GM Link aseprite-extension file
- Click 'Ok' and go to File -> GM Link -> Configure, and browse to your GameMaker project file (.yyp)
- READ AND ACCEPT THE WARNING TELLING YOU THAT YOU'RE RESPONSIBLE FOR KEEPING ADEQUATE BACKUPS/VERSION CONTROL IN CASE SOMETHING GOES WRONG
- Lastly, open up GameMaker and load your project. Add a new, empty sprite named "spr_gmlink_base"
(These steps will appear within Aseprite as well and you'll get a heads-up if you missed something)
PLEASE NOTE: Because GM Link reads and writes files, you'll be asked to give permission by Aseprite. For the most seemless experience, give full permission to the script. If it worries you, feel free to take a look at the source code or just give individual permission when prompted.
Also, GM Link uses Powershell to carry out file and folder related tasks within your GameMaker project, because the scripting support in Aseprite is limited. You will therefore see a command prompt window open up as the extension is loaded. Please keep this window open at all times. If you try to add sprites to GameMaker without this window opened, Aseprite will crash. You can always reopen Powershell by going to File -> GM Link -> Reopen Powershell.
How to use
- Use the Slice tool, hidden behind the Move tool (SHIFT + C per default) to create rectangular slices around your sprite
- From v1.6+, a lot of the actions below can be done even easier through the new Toolbar (SHIFT+T or access via FILE -> GM Link -> Open Toolbar)
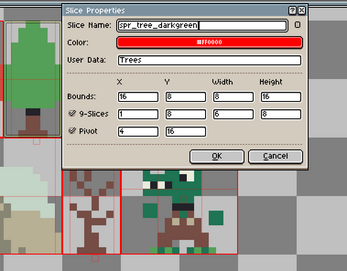
- Double click a slice to edit its properties. Click the little button on the right to reveal the User Data field
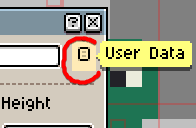
- To put your sprites into subfolders within GameMaker, type the desired path in the User Data field. For example, typing folder1/folder2/folder3 would put this sprite in Sprites/folder1/folder2/folder3/spr_my_sprite in GameMaker
- Edit the bounding box of your sprite using the 9-Slices control. You can edit this visually on your slice if you enable it and click 'Ok'
- Choose the origin point of your sprite by setting the Pivot point
- If you have a sprite that uses multiple frames, ie. an animation, you have three options. 1: Tag your frames and simply hit Update, if you only have one sprite per Aseprite document. 2: If you have multiple, then add the tags to the slice via the toolbox. 3: Lastly, if you have all your frames next to each other like a sprite sheet, you can make one big, wide slice that surrounds all the frames and flick "Strip" in the toolbox
- Whenever you wanna create or update a sprite in GameMaker, just press SHIFT+F5 or go to File -> GM Link -> Update. You can also update only the selected slices using SHIFT+F6
- Keep in mind that:
- Deleting a sprite or changing it in GameMaker will not be reflected in Aseprite. It is a one-way communication from Aseprite to GameMaker
- If you name a slice the same name as a sprite in GameMaker, that sprite will be changed by Aseprite when you update
I recommend creating a new little test project in GameMaker and playing around with GM Link a bit, just to get a feel for how it works.
Important!
You are fully responsible for keeping adequate backups/version control of your project in case something breaks. This extension has not been tested on all versions of GameMaker and has had limited testing in general, so use with caution and please let me know if you discover any bugs. GameMaker has a history of updating their file structures a lot so this extension may break at any moment. Please reach out if that happens and I'll try my best to find the time to fix it.
I hope this is of help to you and you enjoy using the extension! Don't hesitate to reach out in the comments or on Bluesky @torelehmann.bsky.social. Thanks! :)
Btw...
My game TRIMJOB was made fully without ever using GM's standard ways of importing - only GM Link!
Download
Click download now to get access to the following files:
Development log
- 1.7 Beta! New features! #We'reSoBackFeb 05, 2025
- 1.6 Beta!!! - New features and bug fixesDec 02, 2024
- 1.5 Beta - Big new addition and update!Nov 16, 2024
- 1.4! - Aseprite doc connected to GM project automaticallyNov 12, 2024
- 1.3 is out! Bug fix and better yy formattingNov 11, 2024




Comments
Log in with itch.io to leave a comment.
I've just spent 2 hours getting GMLink to work properly, and here's the exact process I followed:
First problem encountered: GameMaker LTS v2.2, everything worked fine, but sprite thumbnails wouldn't load properly for any sprite imported with GMLink. Open sprite OR assign sprite to object and place in room = sprite just doesn't show up until runtime. Only exception was "edit image", which showed the sprite image, and the above problem would be fixed if I actually edited the image and saved changes. Tried disabling the thumbnails option in preferences, but that option doesn't exist in LTS v2.2. This wasn't a total deal-breaker, but it was inconvenient.
Tried: Switching to current version of GameMaker (NOT LTS) v2024.14.2.212. This required reimporting my project. Closed aseprite and GM, reimported and updated to latest version, everything appeared fine. Opened aseprite, switched GMLink config to new path, selected slice, pressed "update", and failed to find spr_gmlink_base, despite this sprite existing in my project. Tried reopen powershell, didn't work. Tried restarting aseprite and Gamemaker, didn't work. Tried deleting and recreating spr_gmlink_base, didn't work. Tried deleting old GMLink imported sprite from GameMaker entirely, then closing everything and reopening. Pressed "update" and bricked my project - error on reloading project + error on relaunching Gamemaker. Tried editing yyp file directly to delete keys, broke it even further.
Deleted project entirely, closed everything, reimported (again) to new GameMaker version. Deleted old GMLink sprite and spr_gmlink_base entirely. Then launched Aseprite, repeated steps above, now stuck on "can't find spr_gmlink_base". Tried everything I could think of - finally told GMLink to use the absolute path to my GM yyp project file. This worked - everything now working as intended. Relaunched both aseprite and GameMaker to test - all good. Hopefully this is helpful to someone!
PS thank you for the extension. If it keeps working, it saves a ton of clicks and time.
Glad you found a solution! I'm still, unfortunately, hung up on other projects and won't have the time anytime soon to make improvements. I hope to find the time next year though, as there are several things I'd love to add on top of the bug fixes and other QoL changes.
No worries - I appreciate the extra work that something like this requires to support :)
Putting this here for next year - the thumbnail error in the LTS version - seemed to be caused by GMLink being unable to find the yyp file within each individual sprite (file structure issue I assume, as you mentioned above).
I added tags to the slice but it just exports the first one (without tag name). So maybe it is replacing first one:
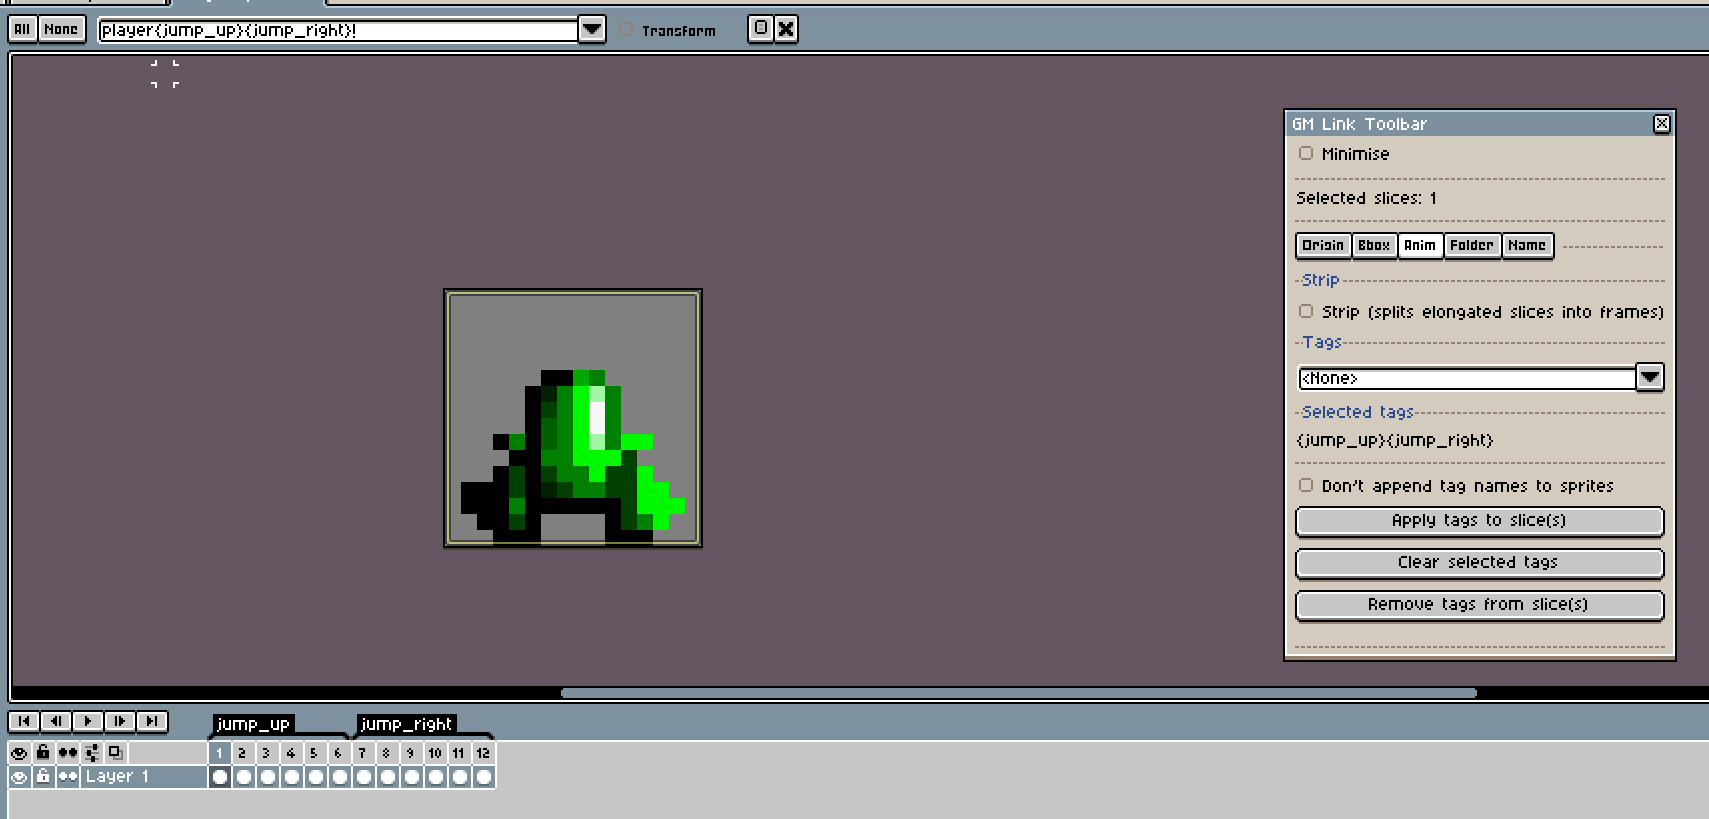
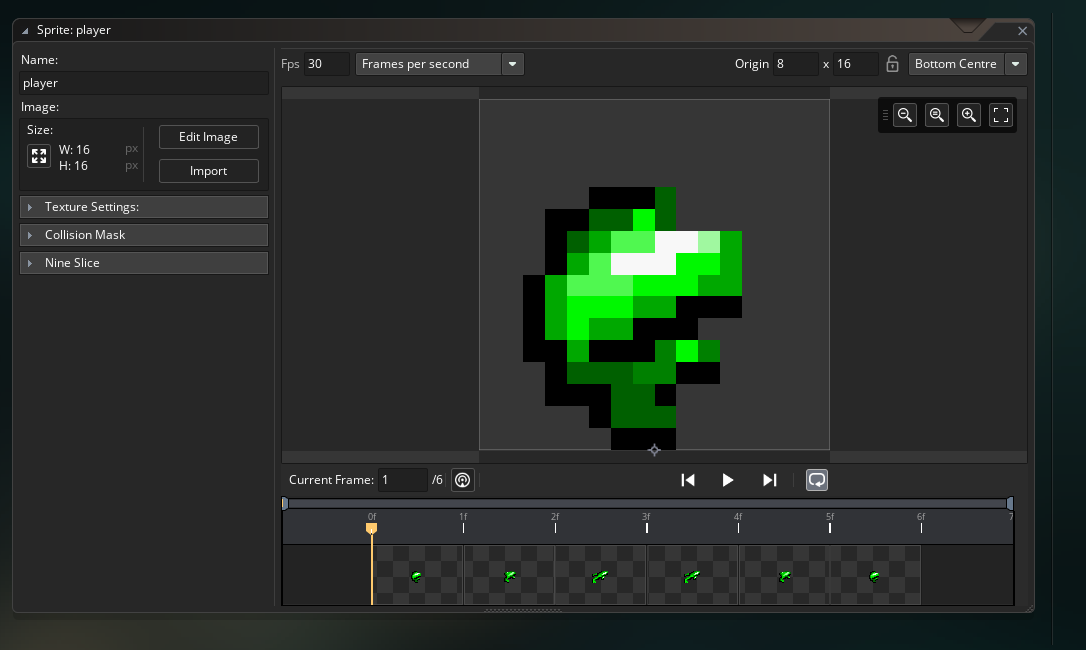
<de_cbutton id="de-cute-id" style="background-image: url("moz-extension://0207092d-fb1d-41f6-8e0b-0c597ca57f13/bestgirl.png"); top: 791.117px; left: 16px;"></de_cbutton>Problem lies in the fact that the Toolbar doesn't show properties and is only commands. I always click on it and select slices to see their properties.
Here for example problem was "don't append tag" was ticked when I added tags initially but then I removed it and was confused why it still not appending.
In the first method of animation explained above, do you have to make slice too?
Because in an Aseprite document that has one animation in frames, tagging doesn't export as mentioned above.
Which of the 3 animation method do you use?
For some reason GM Link isn't detecting my base sprite, i've tried reimporting the yyp, restarting my computer, no dice.
Hi Shrimpy. Is the base sprite located in the root "sprites" folder of your project?
Yes, it is
Alright, well, I obviously have too little to go off of here, but I'm assuming you mean that you get the popup telling you that spr_gmlink_base is missing and you should create it. It pops up if the file "sprites/spr_gmlink_base/spr_gmlink_base.yy" does not exist. If it does and you get it, then I have no clue. I'd say make sure you've connected the correct project file and all that.
I can't recreate it but it was constantly adding tag to my slice despite checking the box and I thought I was doing something wrong. Turns out it needed to uncheck and check.
(I even cleared hash for this, even though I think is unrelated)
Hi,
Since any change you do to the exported file from GM-Link is not reflected back to Aseprite slice, why would you want to change sprite settings in GameMaker? Am I missing something?
I mean if you edit and update, they will be gone, to best of my knowledge.
Cheers
Hi,
In the demo video on youtube, when you update, GameMaker restarts and opens that sprite automatically. Did you cut the part that you manually open the sprite? Because I've never seen it do it.
How to set bounding box for sprite sheet animations? i.e. when all frames of an animation is next to each other in a sprite sheet.
I have a very big sprite sheet that all my animations are in it.
Perfect! For future ppl: You set 9-slice on first frame and it will be applied for the rest of the strip. (It's seems a bit odd to use the horizontal handle since it's so long, but trust me, "this is the way".)
I've decided not to delete my questions that I find answers for so they may help future videos or manual.
Is it possible to change the base folder of "sprites"? As far as I can tell, all we can do will be after "sprites" folder. In my game I put sprites in object's folder, i.e. <root>/player/spr_player_idle.
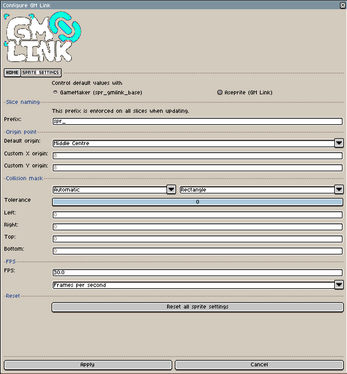
Why most options on second page of the configuration panel disabled, at least for me.
They are disabled when you've left "Control default values with" to GameMaker, as it will then use spr_gmlink_base as its template for these settings. Set it to Aseprite if you want to control those settings through the config window.
Thanks!
ohhhh, so sprites are spr_gmlink_base and if I edit it, everything will be edited from then on.
Which one do you suggest?
Hi,
I sent an email regarding a bug couple days ago, would appreciate if you would take a look at it.
Thanks!
Hey! Thanks for the email. I just replied to it. I will say though, I work more than full-time on other projects and thus cannot always justify spending that much time on GM Link or other free side projects. Therefore I can never guarantee a timely reply or fix, but I appreciate people reporting bugs and problems so I can stuff them on my list and get to them eventually. I hope you can understand :)
Hi,
(not sure if this is the right place to report bugs). Love the extension, thanks again! I found an error, the hard way of pulling hair for a good chunk of time lol.
If an sprite that it's bounding box is set to Auto is edited with Aseprite, when you get back it's collision will be a single pixel on it's top left, no matter the size.
Doesn't happen with mask set to Full Image or manually.
BTW, I compiled Aseprite myself and for some reasong when I open an .ase file, it opens an instance of it instead of a tab and this also creates tab in my Terminal/PowerShell window for each file I open. Do I have to close each of them after the edit or I can leave them open?
Thanks again!
Cheers
Hey! And you are on the newest version, right? Thanks for letting me know. I'll add it to the list and get around to it once I have a bit of time.
Not sure I can help you with the second issue. Maybe you can change a setting for .ase files to open as tabs instead?
Sorry, problem was on my side.
Np, glad you figured it out!
Hi there! Still using gmlink all the time, truly a game changer once again I appreciate your work o7
I do have a feature request:
When setting up prefixes in the config, like "spr_", once you import for the first time it will update all the slices with spr_. If i want to later change that prefix, and update again, all the slices will now be spr_spr_. I think the slice data shouldn't get updated, and should just temporarily use the prefix during the update process. Unfortunately I just had to rename 120 slices after initially setting them up :(
Hey! Glad you're still enjoying GM Link and that it helps your workflow!
Ah, sorry to hear about all of that renaming you had to do. I hadn't thought of that scenario, so thanks for mentioning. My immediate thoughts on your input is that I agree with that. It should probably just slide the prefix in there during updating instead. I'll add that to the list!
Thank you for considering! o7
Hey! It seems like GMS2 Autotile Converter currently doesn't work with this extension. Would you be able to fix this in the future? I'd appreciate it! (Ps. This has been very useful thank you for making it!)
Hi Laura. Glad to hear you're finding GM Link useful :) - I have never heard of the extension you've linked to. Can you explain what you're trying to achieve with it and how GM Link doesn't comply with it, as well as what you'd want GM Link to do differently? Thanks :)
- Tore
Hi! Thanks for answering! The extension turns a specific type of tilemap, A2, to ones compatible with GameMakers autotile system. Being able to use GM Link with this would streamline my game making process! I sent an image of the error I got in my earlier comment. It seems like I can't have GM Link exist in my Asesprite files at all if I want GMS2 Autotile Converter to work.
Okay - I'm still not really sure what you need GM Link to do. Do you want it to be able to import Tile Set assets into GameMaker? The error you linked comes from the other extension, so it doesn't help me that much unless I really start digging. It could also be that the issue lies with that extension and not GM Link. Feel free to drop me any more information you have about this as well as how you reproduce that error, and I'll see if I can find some time to look at it. I cannot promise you it'll be soon.
Thanks for the reply! Yes, I want to import tile assets to GameMaker. The error shows up ONLY when I have both GM Link and GMS2 Autotile Converter in my Asesprite files. Alone they both work perfectly fine. Honestly I'm a complete stranger to Lua and mostly programming in general, so I'm not sure what info to provide. You can take your time! Importing them manually work for now :-)
Not sure if I'm doing something wrong or not but a new sprite (slice) is not recognized in GML and needs IDE restart.
Genius! Life saver. I will support for sure. I had some confusion about sliced that I think can get some clairifcation. Like the slice name will acttually show up in GM, not the sprite name.
Switching tabs in Aseprite while GMLink is on seems to be a bit delayed. Is this normal or is this something on my side?
It's briefly loading your settings for that document when you switch, so it is normal.
Just to add a bit of context to this: Aseprite scripts/extensions all run on the same thread as the rest of Aseprite and thereby also the UI. So anything the script is doing will be blocking for the UI, ie. if it takes a bit of time, the UI will be frozen while it carries out. When you switch tabs, I need GM Link to adjust to the project info that has been configured for that file, and it does so by reading from the config file on disk which is usually really fast but can still be felt briefly. I'm not saying it's impossible to do something about it, I just haven't been looking long enough for it. I will try to implement it if I figure something out at some point. :-)
I am getting the error below when I re-installed GM-Link and tried clicking Configure.
Error: \GMLink\gmlink.lua:2018: attempt to index a nil value (field 'sprite')
Ah, I seem to have missed this scenario. It happens because you try to configure GM Link without having a document/sprite opened. Just create a new doc or open an existing one for now before you press Configure.
Thanks for looking into it. I got passed the error and got sprites to be added to my project for a bit but now it no longer works. I get a message saying sprites have been updated but there are no updates in my project. The GameMaker Project path in the configuration window also is incorrect (it's trying to find my yyp in the same folder as my asesprite file.)
That's really weird as there is no magic to that at all. It's simply a file selection dialog to help you select a file and then that path is saved. What path has been saved in the config file? (In the extensions directory, you can go there through the aseprite settings). Have you saved it somewhere that changes? Onedrive-y path? Something?
Not sure which config file you are referring to but at least gmlink_connections.json shows the correct path? I am not using a onedrive folder.It doesn't show the name of the slice that I was updating though.

I was able to get 1 sprite to be added but that was only after I exited Gamemaker and told it not to save changes. I tried updating that same sprite via GMLink and then the sprite image changed to the one below. I try to edit the sprite file via GameMaker and it said the file is not found.
Are you able to email me a screenshot of the config window and maybe your aseprite file as well? I would also love to know the GM IDE/runtime version you're using. prote1337@gmail.com
EDIT: Seems to be working now. I think I was just not selecting the slice. The project path however does show that it thinks the filepath to my project yyp is in the same folder as my .aseprite file for some reason but it still works.
It doesn't seem to properly retain my GameMaker Project Path which may be causing it not to work? I try updating but it doesn't show any sprite updates and I don't see any newly added sprites on GM based on the subfolder I indicated.
I set it to the absolute file path and then when I go back to the Configure GM Link. it thinks my project YYP file is inside the same folder as the .aseprite file which it is not.
Any suggestions?
Seems weird. Not something I've seen before or can guess to why. Let me know if you find more clues and I'll see what I can do.
Now this is a very promising workflow upgrade tool! I will definitely be following your development on this!
I've been using GM Link for a few days with no issue. Then had the following error warnings (pasted below) when importing a few new sprites. The aseprite file and GameMaker project were the same I'd be using previously. Just added two new sprites. Nothing fancy or different than before.
I'm running GameMaker LTS IDEv2022.03.85 which should be the latest LTS.
Sprites seem to be fine, imported as expected but I'm worried something might be messed up in the asset definition files somewhere deep in my project now.
One clue, I did open the details on a few slices in asprite and changed the color for them so they'd be more visible against the grid. I'm guessing that maybe triggered your 9-slice bounding box code or another advanced feature which I guess isn't fully compatible with LTS?
None of my aseprite slices have 9-slice or pivot turned on, could just changing the color on a slice be enough to change how they export?
UPDATE:
I've run a bunch of tests reverting both my aseprite and gamemaker project each time and restarting gamemaker and it's baffling. Even if I don't add any new sprites, just editing the pixels (touching nothing else) for some sprites triggers the error when I update while others are fine.
Also tried a brand new aseprite file and also got the error when just exporting a single slice. A real mystery what's causing this.
Thanks for posting all this and digging around! It does seem strange yeah. Are you able to single out anything that could be different for the sprites where you get the error? Another thing, if it wouldn't be of too much hassle for you, could you try a newer version of GM just as a test? It's difficult keeping a tool like this error free as the .yy format is so damn specific, at times ever-changing and non-documented. :)
I really can't figure out what would be different. I've had a bunch of theories. Name length, texture groups, the color of the slice, but nothing has proven to consistently make a difference. But conversely it's also not pure random chance every export. Consistently, editing some sprites in my aseprite file trigger it and editing others don't.
One thing that makes it a bit harder to test is that from what I can tell, once the error is triggered once, it won't trigger again till I reload the project and do a new import.
If you haven't been testing the Long Term Stable (LTS) branches of GameMaker my hunch is that this error is to be expected as the LTS and regular GameMaker branches have diverged over time, and the weird anomaly is actually that I'm sometimes not getting this error message.
Just FYI LTS 2022.0.3 is the latest LTS version, released in November. The LTS version release numbers don't match the current year the way the regular GameMaker version numbers do https://gamemaker.io/en/blog/version-lts-r3
---
Some further investigating. I just tested exporting a sprite that gets the error, and one that does not, with my project closed so that I can see exactly what GM Link is exporting before GameMaker throws the error and attempts to fix it. Checking Github desktops diff display for the sprite_name.yy files. What I've found:
The order that elements are listed is different making it difficult to tell if the exact same info is in both the old and new files. Eg. ""resourceType": "GMSprite"," is at line 2 in the old file and line 30 of the new one.
New file is two lines longer, but I can't figure out what exactly was added.
I can find some minor but probably important differences Eg. "resourceType":"GMSpriteFramesTrack" was changed to "$GMSpriteFramesTrack":""
Looking at the the yy file for the sprite that throws an error vs the one that doesn't, both have all the changes listed above, but the one that doesn't throw an error, inexplicably uses the earlier resource version numbers! So yeah the actual mystery here is why it doesn't always use the newer version numbers and throw the error since it's clearly sending stuff in the newer format in both cases.
Once I loaded GameMaker it went into both these yy files and cleaned them up so that the only changes are the various name and ID blocks. So just the stuff with long hex strings like: "b0cb57fe-e71b-4013-bdd3-37565da5b115"
So GameMaker does seem to be handling converting the files back to the LTS standard. It's still a bit worrying though. I generally think of the yy files as dark magic, so any time something strange happens involving them I get nervous.
Let me know if it would be useful to have these various yy files for comparison. It would be great if GM Link had the option to export LTS compliant files in the future, but I realize that may be too big of an ask!
I really appreciate all the info. It's invaluable in order to more easily solve problems like these. For sure, I understand that it's worrying, so it's great that you're using version control! I just released a game and work full-time, so I can't promise exactly when I'll get this one fixed, but I promise I'll be as quick as I possibly can. I never used LTS myself which might be the main culprit behind this in itself. I think I'll get that version you're using and see if I can find the issue. And yes, if you wouldn't mind, I'd like to look at the yy files as well. Please drop me a mail at prote1337@gmail.com. :)
Just sent an email with a bunch of files that'll hopefully help track this down. Totally understand that it may take awhile to get a fix in. Hope the game launch is going well!
Thanks, I was just about to reply to it :)
I just released a new version, but the fix for this isn't included unfortunately. I tested GM Link with your aseprite file and the newest LTS version of GM and everything worked perfectly, so I wasn't able to reproduce it this time around. Hopefully we can come close to the root cause soon so it can be smashed. I'll continue pondering about what could be causing it.
Just found out about this tool and it seems very promising, so thank you for your work. Wondering if there is a way to set a default folder to drop sprites into if no folder data is defined?
Thanks for checking it out - we spoke on your stream. I've noted your great suggestions and are looking to implement them hopefully in january :)
Thanks again! I just wanted to check in and see if there was any update on this? :D No rush, just looking forward to it
Hey! Turned out my little side project "TRIMJOB" took more of my free time than expected, so I couldn't find the time to do GM Link. That game has just been released now though, so I should be able to get to this shortly. Thanks for sticking around with the tool :)
This has now been added in 1.7 :)
Thank you, update looks great!! Regarding importing sprites as frames without using Aseprite animations, do they have to be in a rectangle? Was wondering if there was a way to have 2 unconnected sprites have like a _frame1 and _frame2 suffixes and get combined together.
It's not possible as of now and would have to be added in. It might be a little bit too niche to justify spending a lot of time on currently. What prevents you from just putting them next to each other?
This tool is fantastic its really saved my lot time in importing sprite in gm
Well, there few more things need in for animation
Due to huge amount of frames, its its getting hard to get hard to track them all
If there any way if you implement render just tag frames so it would be more efficient
Hey! Love to hear that it saved you some time. Nice! Yes, so I'm actually quite new to Aseprite. I moved over from years with Pyxel Edit just because I had the idea for GM Link and wanted to change my workflow up. So I want to learn how people like to use it and accommodate that in GM Link. With my limited understanding of tags, I see them as global groupings of cels, right? So they're not tied to a slice in any way for example? How would you like them to work with GM Link? I'm interested in your suggestion as tags were mentioned before as well. Thanks for using the extension :)
OP is right, and that would be great! Usually people have two types of aseprite files: Some with slices, but single or very few frames. These are mostly for static sprites. And for animations, people use a smaller canvas, but use tags to separate animations. I'd be happy to send over some Aseprite files for you to study, too, together with the .yy's you need for the bug hunting. ^w^
That would be lovely and would really help me out! Could you also confirm that the texture group gets reset even after having updated that sprite with the newest version of GM Link once?
Btw, little sneak-peek: the next version includes a new toolbar that allows you to bulk edit origin, bbox and subfolders on slices! I've also added the slice name prefix option in the sprite settings.

This tool is amazing! Great job, it is exactly what's been missing in the GameMaker space!
I would start using it immediately, but there are a few things stopping me from adopting it:
I prefer setting the origin inside GameMaker using "Middle Center" for most of my sprites, because the size might change later and I don't want to calculate it for every sprite. My game has hundreds of little decorative sprites and managing the meta data inside Aseprite slices for them would be quite tedious. Inside GameMaker I can select multiple sprites at once and set Texture Atlas, Origin, Frame Rate etc. via the Inspector.
Unfortunately GM Link overwrites these settings with each update of the art, even if I choose not to use any of the Aseprite metadata.
It would be great if the tool could detect if the sprite already exists inside of GameMaker and update only the graphics and dimensions, keeping the rest of the settings in tact (unless the user chooses to overwrite it with Aseprite metadata).
The same goes for folders: Once the the sprites were created, I moved them deep into my folder hierarchy which is organized by biomes and further sub-groups like foliage, props, negative space, etc. Replicating that structure for every slice would be very tedious.
If a sprite already exists and has been moved to a folder, it would be awesome if it would stay put if no path has been specified otherwise in the Aseprite slice.
For small projects or if you use this from the beginning, it would be amazing!
If it was a little more flexible for different workflows like mine, I would use and buy/support this in a heartbeat! It's exactly what GameMaker needs because updating existing assets is a big headache!
Cheers!
Wow, thank you so much for the detailed feedback! I've honestly been waiting for this because I knew there would be some obvious things that I hadn't thought about. When reading your suggestions, I'm like of course GM Link should be able to handle things like this. Especially the ability to default the origin to center, and also, for GM Link to let already set meta data stay as is and only overwrite if the user overwrites something through Aseprite.
Great suggestions and explanations. I'll get this implemented ASAP and post some update info on SoMe channels as well as here on itch.
Thanks,
- Tore
I'm glad it was helpful! A friend pinged me about it on Bluesky and I got so excited I started shaking lmao. I'm seriously looking forward to the next version! Cheers! :D
I've put up a new version (1.5 beta) that should, hopefully address the issues you had. Please check it out and let me know what you think. :)
Hi! Wow that was quick! :D
I wanted to jump right in but I only had time for a quick test yesterday. I will poke it some more during this week, but here's my findings so far:
My sprites now stay in the folder, which is great! The origin also seems to stay where I put it! :D
Some other settings still get overridden.
- Texture Atlas was back to default
- FPS for all sprites were set back to 30
Maybe this could work: If settings are set to "grab defaults from gmlink_base", only use them for initial creation of the sprite and then leave them as-is, as to not overwrite modified values. If the user wants to reset them to default, all they'd have to do is delete the sprite and re-export it, and it will get recreated using the gmlink_base defaults.
What I haven't tested yet, but what I use a lot in my game is actual 9 slices.
There also seems to be a small issue with the collision mask: The mode is set to Automatic and Rectangle, but the mask covers only the pixel in the upper left corner. When I switch the mode to manual and back to automatic GM will update it properly. This also seems to be overridden with each update to the sprite. My guess is, because gm_base is empty, the bounding box is calculated based on that and then applied after the art is added.
If I set the bounding box to manual, the values will not be overridden, which is great!
And a tiny improvement idea I had for lazy people like me: It would be really cool if we could define a standard file name prefix in the settings window, such as "spr_"! :D
Thank you for your hard work, and I am very flattered you're addressing my feedback!
Have a great start into the week!
Ah okay, seems like I missed a couple of things. Once again, thank you so much for the feedback. It helps a lot and I really appreciate it. I'll get those things sorted as soon as time allows! Great suggestion with the prefix. I assume you mean so a slice could simply be named "player" but in GM that would become "spr_player" if your prefix was "spr_"?
You have a great week too! :)
- Tore